Promicra QuickPHOTO – Industrial
Microscope Imaging Software
QuickPHOTO INDUSTRIAL 3.1 program is designed for acquiring digital images from microscopes equipped with digital cameras, editing, annotating and saving of acquired images and measurements. This program is targets industrial and materials science applications.
QuickPHOTO INDUSTRIAL 3.1 includes many measuring functions such as lengths, perimeters, areas, angles, distances of parallel lines, counting of objects, phase analysis, measuring of hardness and microhardness. Also equipped with advanced exporting and reporting functions.
Main Features Overview:
- Image acquisition from a wide range of imaging devices (microscopic digital cameras, digital SLR cameras, analog cameras, scanners)
- Live view on a computer screen (facilitates focusing and can be used for demonstration purposes)
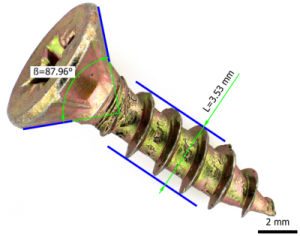
- Measurements in acquired images: insertion of a calibrated scale bar, measuring of dimensions (lengths), perimeters, diameters, areas, angles, distances of parallel lines, objects counting, advanced phase analysis, evaluation of hardness and microhardness tests, overlay orthogonal and circular grid display
- Measurements in a live view: calibrated scale bar, dimensions (lengths), perimeters, diameters, areas, angles, distances of parallel lines, overlay orthogonal and circular grid display (these features are available for Lumenera® INFINITY and PROMICAM digital cameras only)
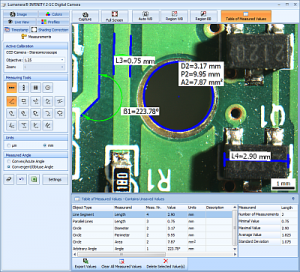
- Measured values are displayed in a well-arranged table with basic statistics. Particular measurements can be annotated; measured values can be exported (optionally with the image with measuring objects) to a Microsoft® Excel® file or a text file.
- Measured values can be continuously exported to an open Microsoft® Excel® workbook
- Advanced functions for saving of multiple images at once
- Option to automatically save acquired images to a predefined folder
- Microsoft® Word reports
- Support for zooming units, magnification changer units and magnification encoders (devices for automatic determination of currently used microscope magnification)
- Image editing functions, indication and annotation of interesting areas of the image, image descriptions
- Advanced printing functions including interactive preview
- Automatic time-lapse image capturing with the options to control computer controlled illuminators and time-lapse HD video creation
- Option to acquire images using a a remote trigger (optional accessory)
- Calibrations can be locked with a password protection, the calibrations are protected by a digital signature
- Support for work on two-monitor workstations
- User friendly graphical interface
- Multi-language support: English, German, Czech, Slovak, Polish, Spanish, Hungarian, Russian, Ukrainian, Chinese
- Possibility to extend functions with additional modules (Deep Focus, HDR, Image Stitching, RECORD IT, FLUO+)
Measuring Features (in acquired images):
- Insertion of a calibrated scale bar (options to define type, size and colors; vertical or horizontal position)
- Measuring of dimensions (line segment and polyline tools)
- Measuring of areas, perimeters and diameters (ellipse, rectangle, polygon, circle defined by radius, by diameter or by three points tools)
- Measuring of angles (arbitrary angle, angle from the X axis, angle from the Y axis, angle defined by two line segments with the vertex possibly outside the image)
- Radius, angle and length measurement of an arc
- Measuring of a distance between two parallel lines
- Counting of objects
- Phase analysis with an option to define areas of measuring
- Evaluation of a Brinell hardness test (according to the EN ISO 6505-1:1999 standard) and a Vickers microhardness test (according to the EN ISO 4516:2002 standard)
- Display of a calibrated overlay grid (orthogonal, circular)
- Choice of measurands and their labeling for individual measuring tools
- Measured values can be exported (optionally with the image with measuring objects) to a Microsoft® Excel® file or a text file
- Measured values can be also continuously exported to an opened Microsoft® Excel® workbook
Measurements in a Live View:
This feature is available for Lumenera® INFINITY and PROMICAM digital cameras only.
- Insertion of a calibrated scale bar (options to define type, size and colors; vertical or horizontal position)
- Measuring of dimensions (line segment and polyline tools)
- Measuring of areas, perimeters and diameters (ellipse, rectangle, polygon, circle defined by radius, by diameter or by three points tools)
- Measuring of angles (arbitrary angle, angle from the X axis, angle from the Y axis, angle defined by two line segments with the vertex possibly outside the image)
- Radius, angle and length measurement of an arc
- Measuring of a distance between two parallel lines
- Counting of objects (this feature is currently available for PROMICAM cameras only)
- Display of a calibrated overlay grid (orthogonal, circular)
- Choice of measurands and their labeling for individual measuring tools
- Measured values can be exported to a Microsoft® Excel® file or a text file
- Measured values can be also continuously exported to an opened Microsoft® Excel® workbook
Features Description:
Image Editing Functions
The images are immediately after acquisition transferred to a computer and prepared for processing. QuickPHOTO INDUSTRIAL 3.1 program allows working with multiple images at the same time. For comparison two or four images can be displayed side by side. The Thumbnail Browser enables to easy switching to another opened image by a single mouse click. The Navigator window facilitates the work with the magnified images.
The images can be edited using the following functions:
- Crop (crop size can be defined in pixels, µm or mm)
- Rotation (by 90° clockwise and counter clockwise)
- Flip and mirror
- Resize
- Brightness and contrast adjustment
- Color balance adjustment
- Histogram adjustment
- Filters (sharpen, blur, negative, grey scale, median filter)
- White balance and black balance
- Indication of interesting areas (line, arrow, ellipse, rectangle, circle and freehand drawing tools)
- Insertion of text annotations
The Advantage of Working with Layers
All inserted objects (drawings, annotations, measurements) are displayed in a separate layer “above the image“. It is possible to modify (change of the line’s color and thickness, change of size, change of position), delete, or hide them at any time. It is also possible to delete the whole layer with inserted objects or it is possible to merge this layer with the image.
Microsoft® Word Reports
Images with measured values can be very easily exported into reports in Microsoft® Word format. You can create custom report templates with various layouts and number of images. Templates are created in Microsoft® Word using standard formatting functions.
Evaluation of Hardness and Microhardness Tests
QuickPHOTO INDUSTRIAL 3.1 program can also be used in conjunction with hardness testers. The program includes features for evaluation of a Brinell hardness test and a Vickers microhardness test.
Phase Analysis with an Option of Defining the Areas of Measurement
The Phase Analysis feature is designed especially for material science applications. This feature enables measuring of percentage amount of a particular phase (color/shade of grey) in the image. There can be defined the areas of measurement in the image. Up to four phases can be measured in one image. It is possible to select various colors of displayed phases, add another color/shade of grey to the current phase, invert the phase, set tolerance and overlays. As a result the percentage amount of each phase in the image is calculated.

Control of Imaging Devices
Every supported imaging device can be controlled by a dedicated control panel. The control panel contains a live view from the imaging device and control for control of its functions and properties.
List includes Prior Scientific XYZ components, Canon DSLR cameras, Lumenera cameras and more. Check wit us to see if we can control your device!
Imaging Devices Controlled via TWAIN Interface
The imaging devices, which do not have their own control panel in QuickPHOTO INDUSTRIAL 3.1 program, can be controlled via TWAIN interface. Those devices can now be used also in conjunction with built-inTimer module as well as with Deep Focus z-stacking module.
Image Acquisition from Analog Video Sources
The QuickPHOTO INDUSTRIAL 3.1 program is equipped with a control panel for image acquisition from analog video sources (analog cameras, DVD players and other analog devices).
Time-Lapse Image Capturing
The built-inTimer module enables a time-lapse image capturing (automatic image capturing in defined time interval). The Timer module is capable to control the computer controlled illuminators. That way the illumination can always be switched on only for the time necessary for image acquisition to prevent a negative long-term effect of the illumination to the specimen.
Time-Lapse Video Creation
The built-in Time-Lapse Video module can be used to create HD video clips (with resolution up to 1920 x 1080 pixels) from time-lapse captured images. For example when several (or several thousands) images of a slowly moving or changing object are acquired, the Time-Lapse Video module can be used to create a video file in which the movement will be recorded in a speeded-up form.
Two-Monitor Workstations Support
Two-monitor workstations are supported by QuickPHOTO INDUSTRIAL 3.1 program. The main program window can be displayed on a primary monitor, while the control panel of a digital imaging device with a live view from a microscope can be displayed on a secondary monitor.
Remote Trigger
A remote trigger is an optional accessory which makes image acquisition even more comfortable. The images can be acquired by pressing a trigger button.
System Requirements:
| Minimum Requirements | Recommended Specifications | |
| Processor | Single-core 2.4 GHz | Multi-core processor |
| Operating Memory | 1 GB | 2-4 GB |
| USB Ports | 2x USB 2.0/3.0 | 2x USB 2.0/3.0 |
| Operating System | Microsoft® Windows® XP(SP3)/Vista/7/8/8.1/10 |
Microsoft® Windows® 7/8/8.1/10 |
| Monitor Resolution | 1024 x 768 pixels | 1920 x 1080 pixels |


